Draft Cycle Works

Sunday, March 14, 2021

Survivor Chop: Gauge and dash plate install

I was told that this old blue chop used to have stock gauges, but when it arrived here, it had nothing.  It was however dropped off with a mini speedo, so I snagged a matching mini tach and modified a few brackets to mount them to the top of the risers using one of the top clamp bolts.  It was difficult to find a good, clean location for these, but I think the final location looks very tidy and doesn't add a lot of bulk to the look of the chop.  Sometimes a chop can look pretty cluttered when they have all of the gauges and wiring intact.

The front wheel is a stock CB750 wheel, so it uses a stock speedo drive.  John had a custom length speedo cable made that worked perfectly.  I needed a custom tach cable as well, but it was so close to stock lengths, that I looked for an oem part that would work.  I found that the VT500C cable, motion pro PN 02-0110, was almost perfect.  I would prefer that it was a little longer, but it's so close to being right... and at a great price compared to a custom cable.

Modified mounts for the speedo and tach.

Gauges installed.

The wires were not covered under the light cluster when the bike arrived.  Before John picked it up, the previous owner had cut all the wiring for the handlebar controls in an attempt to put ape hangers on.  they were poorly spliced and I'm guessing this is the point in time when this cover went missing.  I cleaned up all the wiring and organized it in the housing.  I made a new cover out of 0.6 mm thick mirror polished 304 stainless steel plate.

Shiny plate, pretty face.

Survivor Chop: Front Brake Setup

Brake work was completed back in June of 2020, just before my second left ulnar nerve surgery.  I had some brake lines made up at Colliflower and purchased a radial master cylinder with a remote reservoir.  The master cylinder was from a Beull, part number H0507.1B7.  I used a radial master cylinder with a remote reservoir because a standard linear master cylinder with integrated reservoir was too big to fit on the 6 bend bars.  After rigging up a remote reservoir and awkwardly bleeding the system, it worked very well.  

A rough picture of the master cylinder during mockup.  Notice the limited space on the bars.  Here, I was trying to mount the reservoir on the top of the bar, but I ended up making a tab and mounting it to the frame of the master cylinder.

Finished reservoir setup.


This bike has the complete stock wiring harness with all the lights, bells, and whistles.  This includes the handlebar controls.  They take up quite a bit of room on 6 bends, where real estate is at a minimum.

Awkwardly bleeding the system with the new reservoir mounted.

The pressure switch for the brake lights was incredibly tricky to mount, but I eventually fought it into submission.  It did not make bleeding the system easy.  Honestly, for a relatively simple system, this one took quite a while to bleed.

Caliper hanging out while trying to get all the air up to the m/c.  I ran a 90* into the caliper so the brake line looked cleaner.

The caliper is a Hurst Airhart setup, which only gives you a little more braking power than a hill holder.  It's good enough to slow you down a little in the curves, but wont help much in an emergency stop.  It fits well with the vintage look of the bike, so it had to stay.  I cant say that for the radial m/c, but it's the only thing that seemed to work.

I had to replace the caliper bolts and the brake stay as well.  These were simple fixes.


Survivor Chop: Clutch Repair

This one is short, but important.  When removing the clutch, you can use a pair of channel locks to keep the basket from rotating as you use the clutch nut tool to remove the nut.  Same for reinstallation. Just use the sides of the jaws to resist the rotation by placing them against the flat bosses next to the springs and pressure plate posts. Clutch nut torque is 33 - 36 ft-lb.  When removing or installing the pressure plate, be sure to tighten or loosen the 4 bolts evenly.  The pressure plate breaks easily when this is not followed.  I've only ever broken one... this one... out of many.  But I'm usually careful.  The proper torque for the pressure plate bolts is 6 - 7.5 ft-lb.

Removing clutch nut.

Ensure that the pressure plate bolts are evenly loosened or tightened.  When installing, make sure that the plate is moving down onto the clutch hub studs properly to avoid the bolt clamping down prematurely on the wrong surface and potentially leading you to snapping the pressure plate.


All steels should have the sharp edge facing inward or at least in the same direction.  I placed a v notch on each of the oiling holes in the clutch hub to aide with oil collection.  This is a tip from Hondaman that I did on my heavily built 836 in Rock Flute and there was slightly noticeable difference in the smoothness of the clutch.  Before doing this, the clutch was grabby and neutral was impossible to find. Cut the V groove so oil is funneled into the oiling holes.  I.e. on the left side of the holes when looking at the bottom of the inner side of the clutch hub.  The clutch rotates clockwise.

Clutch parts cleaned and inspected.  Note the v grooves in the hub at the top left. Not the prettiest work, but it seems to help.


Survivor Chop: Clean and Polish

This topic isn't exactly the most exciting, but it's very rewarding.  When this bike showed up, it was dirty, the chrome was pitted and flaking, and the paint looked dull.  It looked a lot better in pictures than in reality.  

Time to get to work, pulling it apart, scrubbing, polishing, waxing, and blistering.  For this, I'll be using, blue magic metal polish, Collonite 845 insulator wax, 0000 steel wool, microfiber cloths, plastic brushes, degreaser, carb cleaner, soap, and water.  I made a deal with a polisher to get a full set of engine covers polished in exchange for some spare covers for him to polish and sell.  It worked out great because, well, I hate polishing and have quite a few spare engine covers.

One thing to note that is very important.  If you have your engine covers polished, be sure to wash them thoroughly to remove any remaining rouge before putting them on your engine.  Rouge is abrasive and while it may seem insignificant, you don't want chunks of this stuff floating around in your oil.  also, while the covers are off, this is the best time to put a good coat of sealing wax on.  Enter Collonite 845.

This work was done quite a few months ago, but I haven't been able to keep up on the blog.  I was in between a surgeries to fix damaged nerves in my arms, so my Dad was helping out quite a bit.  And he continues to do so.   We basically scrubbed and polished everything we could. While tearing the bike down for cleaning, we inspected everything to ensure it was in good order, greased the greasy parts, and replaced all gaskets.  The rear wheel turned out surprisingly good, considering it's perceived condition when it arrived.  My Dad is obsessed with doing great work, and it shows.

Dad working on the rear wheel.

Bolting the sprocket to the carrier.

Piles of parts.

The pipes cleaned up nicely even though they still have some sort of acid drip markings on them.

Scrubbing every tiny bit.

Polished engine covers.

In the picture above, notice that the stator cover it dressed up with some black paint for accent.  This is a relatively simple job and I think it looks great.  Just roughly mask off the stator cover except the outer ring and the Honda logo, spray black and let dry to touch.  Once the paint is dry to touch, remove the tape and gently wipe away the paint on the side of the outer ring and the lettering with a solvent, leaving the background black.  I follow this by carefully polishing the exposed aluminum to minimize oxidation.

Unmasked and painted stator cover before wiping off the excess paint with solvent.

While removing excess paint, you may accidentally remove paint from the background.  Just dab a little paint on the bare spot to fill it back in.  Oops.

Finished product.

Once everything is cleaned, polished, greased, etc. it's time to throw it all back together.  I bought a stainless steel bolt kit for the engine and polished all of the heads.  When using stainless bolts on an aluminum block, consider using a dab of antiseize.  The contact between stainless steel and aluminum causes galvanic corrosion and can cause the bolts to bind up and make removing them in one piece difficult or impossible.  Its a little more work up front, but it's good insurance.  A little dab will do ya.

Polish, polish, polish.

Polish, polish, polish.

ANTISEIZE people!!!  I hate snapping these bolts off.  Also, 5 ft-lb of torque is the spec for most of the engine bolts.  You might need a little more to help it seal on worn surfaces, but be careful.  The antiseize will also help you get more torque without binding up the threads.

Here's a little before and after of the paint and polish process.

Before.

After.

More after.  So pretty.

Ok, one more.

I installed a few parts that John had given me, including that super shiny bread box air cleaner.  Thanks John!

It runs and rides now, but still needs more work.

Out for a little celebratory ride with my homey.

Now, onto more work. I still need to replace the front brake line and master cylinder, tune the carbs (they're way out...150s are a no-no for a stocker), make a plate cover for the instrument light cluster, etc. etc. etc.

Friday, May 22, 2020

Survivor Chop Engine Paint: Repainting an engine in the frame.


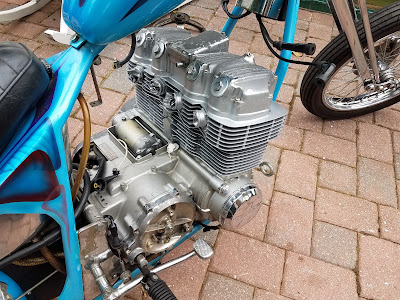
Grungy engine with a poor attempt at a black wrinkle paint top end.

One of the biggest issues with the cosmetics on this bike, aside from the slowly deteriorating retro paint job, is the engine.  The chrome covers are shot and a previous owner decided to make an attempt to paint the top end with black wrinkle paint.  I hate wrinkle paint.  Most of it is already flaking off like the chrome, but there's still plenty partially stuck all over those nice fins.  The bottom end paint has held up OK for 48 years.  It has the typical yellowed look.

To clean this engine up, I am going to repaint the top end in the frame, replace the engine covers with a polished set, and clean the bottom end up.  Aluminum Duplicolor enamel engine paint (DE1615) matches pretty closely to the factory gray, but the yellowing of the original paint will always make it look a bit different.  Other engines I've worked on had paint that didn't yellow as much, so sometimes repainting parts instead of the whole can work out better than this.

Materials I will be using to clean the engine include brake cleaner, simple green, carburetor cleaner, rubbing alcohol, water, 1/4" and 3/8" steel wire tube brushes, scuff pads, sand paper, screwdrivers, paper towels, and a drill. For painting and masking, I will be using Duplicolor engine enamel in Aluminum, painters tape, newspaper, drop cloths, and saran wrap.

The first step in repainting the top end while in the bike is to strip everything off the engine and get it out of the way.  I removed everything but the valve cover because it will be used to essentially mask off the cam area during painting.  Plug all the ports and entryways into the engine.  Next, I gave the bike a good rinse with a solvent.  I used Brakleen, which can sometimes discolor paint, so be careful.  Carburetor cleaner and brake cleaning solvents can damage paint, but I've used it many times to quickly degrease older paint.  The fins on these engines hold a lot of grime, so it's important to be thorough if you want your new paint to adhere.  I sprayed the engine down until the stream of solvent coming out of the fins was a very light brown, instead of the coffee color that it originally began with.

Once most of the grease had been washed away, it's time for a long scrubbing process.  Using steel wire brushes on aluminum can be pretty aggressive, so you may want to try brass brushes first and see if this will remove the loose paint.  Unfortunately the large chunks on this engine won't budge.  I cut the looped ends off the 3/8" tube brush and chucked it in the drill.  Beginning at a slow speed, move the tube brush in and around all of the fins, being sure to scrub every surface.  These tube brushes can make quick work of the debris between the fins.

3/8" wire tube brush getting acquainted with the engine.

Leave the handle long on the tube brush to allow for a long reach and some flex to get into difficult areas.

Continue to scrub every fin, top and bottom until only a light dust comes out.  Rinse with water and simple green as you go to keep the surfaces somewhat clean.  If you're using steel wire brushes, be careful not to scrub too long because you will leave deep scratch marks in the fins.  You'll then need some heavy coats of paint or some primer to level it out again. Once all of the fins have been scrubbed, go back over the outer edge with 240-320 grit sand paper or maybe just a scuff pad to knock off any loose paint that got missed by the brush. Be sure to sand and smooth the top part of the head very well because this is the most visible area.

Early stages of wire brushing the fins.

Cleaned fins ready for a lot of rinsing and further degreasing.

More cleaning/rinsing is needed because, while the wire brushes scraped away a lot of loose paint, it's inevitable that they also found many chunks of stubborn grease that have now been smeared across the metal. More brake cleaner can be used, but it can leave residue that will need to be removed before painting.  Carburetor cleaner does not leave a residue, but can damage paint, so use it carefully.  Other safer options are simple green or high proof alcohol.  Since I ran out of simple green, I'm using carburetor cleaner sparingly, followed by a full rinse in 91% rubbing alcohol.  

Every fin and surface will need to be wiped down with solvent.  To do this, I cut strips of paper towels and wrap them around the end of a flathead screwdriver that fits between the fins.  Spray generously with rubbing alcohol and replace the strips of paper towels until they come out mostly clean.  It's difficult to get everything out of the fins when working with the engine in the frame, but patience pays off.

Materials for cleaning before paint.
My shop apprentice applying the rubbing alcohol generously.

Strip of paper towel wrapped around a flathead screwdriver.

Once everything is clean, it's a good idea to degrease the surrounding materials so tape will adhere nicely when masking off for paint. Another good reason to use rubbing alcohol is that it dries quickly and wont leave hidden puddles that will prevent the paint from sticking.  When everything is clean and dry, it's time to start masking off for painting.  

I set my Duplicolor aluminum spray can out in partial shade so it can warm up while I mask off the top end.  This helps the paint flow and level better.  Just be careful because it will run easier.  You can also use an etching primer to aide with adhesion to bare metal.  I use this on many parts, but have had very good, consistent success with just spraying the Duplicolor engine enamel directly onto bare aluminum engine cases.  

For top end repainting, I mask off just below the base gasket so I can hide the edge of the paint job.  begin masking from the edges of the painted area outward. Then finish off by covering every surface to ensure no rogue paint particles haze up your trippy frame paint.  After taping off the edge near the base gasket, I tape newspaper over the lower edge of that tape and work outward.  After the engine is mostly covered, it's time for drop cloths and saran wrap for any odd protrusions like the turn signals.  When masking off to paint an engine in the frame, always consider the angles you need in order to properly coat the surfaces.  I tape off the down tubes to minimize the interference of the masking on how I can spray onto the fins.  

When everything is masked off, look at all the masked surfaces from every angle to ensure that it is all covered.  Now it's time for paint.  Shake your paint like mad.  If you're using an etching primer, follow the instructions and lightly mist the bare metal surfaces.  Let it dry and then move on to base coat.  Since I'm not using etching primer here, I'm ready for the color.  The first two coats should be light.  Dont try to saturate and get even coloring on the first two coats.  Spray at an upward angle to get the bottom of the fins and a downward angle for the top of the fins (about a 15 degree angle).  Let the paint dry for 5 to 10 minutes between coats depending on the temperature you are painting in.  After the first two coats, apply a medium coat.  Let this dry for a few minutes and then you can apply another coat if needed to level the surfaces a bit.

Top end masked off.

Top end painted and drying.

Look around to make sure it's even and completely painted.  Once satisfied, let it dry for at least an hour before removing the masking.  You don't want to ruin or streak the paint by dropping a cloth on it.

Before paint.

The finished product.  Next, I'll to throw on the polished covers.

Note the slight different in shine and color between the cases and the top end.

Let the paint cure for a few days to ensure that it will hold up to impact, solvents, or grease and oil.  The next step is to replace the engine covers with a polished set.  Removing the valve cover may allow engine oil to leak onto the freshly painted surface.  If the paint isn't cured, the oil could permanently discolor it. 

So for now, I'll let the engine chill off to the side while I clean and polish all of the other bits on the engine.  

The TLDR version:
1. Degrease engine with brake cleaner or other solvent (be considerate of your paint).
2. Scrub fins and surfaces with wire brushes.  Use 1/4" and 3/8" tube brushes in a drill to get in between the fins. Finish the paint and debris removal with 240-320 grit sand paper and stuff pads being sure to smooth the top surface of the head.
3. Rinse and wipe down every surfaces until clean.  Use strips of paper towels on a screw driver to get in between the fins. Carburetor cleaner and rubbing alcohol do not leave a residue and are best suited for the final rinse before paint.
4. Mask off the area.  find a good place to hide the edge of the new paint such as masking right against the base cylinder gasket.  Mask all other areas of the bike.  Double check your masking.  A little acetone carefully rubbed onto fresh paint can remove it quickly.  Just be careful and look to see if the color of the paint below it isn't coming off as well.
5. Spray two (2) light coats of paint from a warm, well shaken can.  Wait 5 to 10 minutes between coats to prevent runs.  The warmer the paint, the better it levels, but the easier it runs.  Duplicolor engine enamel works well with or without etching primer (as long as your surfaces are thoroughly prepped). Finish with a medium coat and some touch up to level the surfaces.
6. Let the paint dry for at least an hour before removing the masking.
7. Let the paint cure for several days before doing any other work in the area that may cause the paint to come in contact with solvents or grease and oil.  Solvents may quickly remove the fresh paint and the grease and oil may discolor it.
8.  Enjoy your engine now that it doesn't look like a boat anchor.

Tuesday, May 19, 2020

Freshening up a Survivor CB750 Chop

1972 CB750 survivor chop headed to the shop for some work
                             
   
After buzzing around on the CB550 for a while, I decided to make a deal with John at DCW and traded it for a survivor chop that he picked up a while ago.  I'm glad the 550 will still be around.  The kids loved working on it and we have plenty of good memories with it in the family.  But, onto new things. Adios, good buddy.

Uncle Mike's restored 1978 CB550 headed over to John's

Imaginary road trip to Arizona to visit their cousin
The bike under the microscope is a 1972 CB750 in a trailing plunger frame, equipped with a springer, mini disc, spoke wheels, 6 bend bars, factory wiring, factory controls, factory turn signals, and a bunch of other factory bits.  It was a quality build from the 70's that must have used a kit that swaps over a lot of the factory items.  The factory light cluster is even mounted between the custom risers that John made to fit the narrow 6 bends to the springer riser spacing.  My plan is to retain all of the factory items, clean the bike up, and do a few upgrades for safety and reliability.

Factory indicator dash and wiring repair in progress

The frame is conservatively molded, with a great layered paint job.  It needed a good bath, some fresh paint on the engine, a little wiring, and a few mechanical fixes.  Otherwise, it's in great shape for being nearly 50 years old.  The first thing I took care of was the bath.  It was covered in a nice layer of road grime and dust. What looked like bad chrome was really just aged chrome with a lot of dirt.  

After it was relatively clean, I fixed the wiring in the cluster that the owner John bought it from had modified.  This gentleman decided to extend the wires for the for the factory controls so he could fit some apes.  The apes didn't look right and were the first thing to go when John got the bike.  I finished properly crimping and extending the wiring, then added a fiber loom to keep it organized and tidy.  I had to rebuild a set of control housings and buttons from a couple sets because the original ones were worn out. I cut out a hole for the wiring to exit the throttle housing on the front, close to the brake perch, because the bars were not dimpled like factory bars.  The picture of the factory light cluster above shows the new looms, cables, and factory controls midway through the process of wiring.

While working on gathering a few parts, I've begun stripping items off the engine to fix the peeling top end paint.  At some point, someone painted the top end black, but seemed to have skipped surface prep altogether.  The carbs were pulled and will be cleaned/inspected and new fuel lines will be routed. The exhaust and brackets will be cleaned and the hardware will be upgraded for a tighter fit.  The long pipes have a joint just behind the mid controls that is slugged with a piece of black pipe.  It fits nicely, but the small #10 hardware allows for a little more movement in the kickup section of the pipes than I like.  No one likes to see floppy pipes on someone's bike when you're trailing behind them... just waiting for them to pop off and find their way under your tire.

Black pipe inserts for 4-4 exhaust kickups


On the first trip around the neighborhood to give the kids a little ride, I noticed that the clutch was dragging quite a bit.  With the engine off, in first gear, clutch in, rolling the bike would spin the engine.  It certainly needed an oil change, but since I'm replacing the crusty chromed covers with polished aluminum ones, I decided to inspect the clutch.  Upon disassembly, I found 2 of the 4 pressure plate bolts were snapped off and only being held in by some mysterious material, possibly galvanic corrosion.  The clutch fibers, steels, springs, and basket were in great shape.  Perhaps a little flex in the pressure plate along with a very sticky motor oil was causing the drag.  At this point I'll be installing a new clutch plate because 2 of the posts are filled with steel studs and the other two are likely damaged because the bolts were significantly over-torqued.  While the clutch center is out, I'll add "V" grooves to the oiling holes to increase film capture and aide with oiling the clutch (a la Hondaman).
Grungy engine and dis-assembled clutch

Clutch plate with damaged posts

This is a long intro for the new addition.  Eventually we might come up with some ridiculous name for the bike instead of "the blue bike," so it can join the ranks of Rock Flute, Bat Vagina, and War Bagel. Usually only the bikes that hang around for a while get a name.  I expect to hang onto this one for a long time.

To Do:
- Clutch: Finish repairing the clutch, scuff the steels, V groove the clutch center, properly torque pressure plate bolts to 6-7.5 ft. lbs and the clutch nut to 33-36 ft lbs.
- Dress Engine: Prep and repaint the top end to factory aluminum, install new polished covers.
- Brakes: Source front brake lines and fit new radial master cylinder (slim fit with the 6 bends), replace caliper stay.
- Exhaust: Upgrade hardware on exhaust pipes and add spacers to rear bracket to raise exhaust 1/2".
- Chain Guard: Replace or clean and properly secure.
- Speedo/Tach Install: Add mini speedo and tach with custom drive cables (factory speedo drive).
- General Maintenance: Clean/inspect/sync/document carbs, set valve clearance, timing, cam chain tension, oil change. 
- General bike inspection: Put a wrench on everything, check brakes, check lighting, check tires/wheels, check fuses, check all soft and hard components, etc.
- General upgrades and repairs: Weld wider plate to kickstand and a bunch of unknowns.
- Clean and Polish: shine paint and metals, treat soft components, restore rubber/plastic coloring.  Buffing wheel, polishing compounds, silicone treatments, rubber softener, etc.
- Bunch of other little things:  All those things I cant think of right now.