 |
Grungy engine with a poor attempt at a black wrinkle paint top end.
|
One of the biggest issues with the cosmetics on this bike, aside from the slowly deteriorating retro paint job, is the engine. The chrome covers are shot and a previous owner decided to make an attempt to paint the top end with black wrinkle paint. I hate wrinkle paint. Most of it is already flaking off like the chrome, but there's still plenty partially stuck all over those nice fins. The bottom end paint has held up OK for 48 years. It has the typical yellowed look.
To clean this engine up, I am going to repaint the top end in the frame, replace the engine covers with a polished set, and clean the bottom end up. Aluminum Duplicolor enamel engine paint (DE1615) matches pretty closely to the factory gray, but the yellowing of the original paint will always make it look a bit different. Other engines I've worked on had paint that didn't yellow as much, so sometimes repainting parts instead of the whole can work out better than this.
Materials I will be using to clean the engine include brake cleaner, simple green, carburetor cleaner, rubbing alcohol, water, 1/4" and 3/8" steel wire tube brushes, scuff pads, sand paper, screwdrivers, paper towels, and a drill. For painting and masking, I will be using Duplicolor engine enamel in Aluminum, painters tape, newspaper, drop cloths, and saran wrap.
The first step in repainting the top end while in the bike is to strip everything off the engine and get it out of the way. I removed everything but the valve cover because it will be used to essentially mask off the cam area during painting. Plug all the ports and entryways into the engine. Next, I gave the bike a good rinse with a solvent. I used Brakleen, which can sometimes discolor paint, so be careful. Carburetor cleaner and brake cleaning solvents can damage paint, but I've used it many times to quickly degrease older paint. The fins on these engines hold a lot of grime, so it's important to be thorough if you want your new paint to adhere. I sprayed the engine down until the stream of solvent coming out of the fins was a very light brown, instead of the coffee color that it originally began with.
Once most of the grease had been washed away, it's time for a long scrubbing process. Using steel wire brushes on aluminum can be pretty aggressive, so you may want to try brass brushes first and see if this will remove the loose paint. Unfortunately the large chunks on this engine won't budge. I cut the looped ends off the 3/8" tube brush and chucked it in the drill. Beginning at a slow speed, move the tube brush in and around all of the fins, being sure to scrub every surface. These tube brushes can make quick work of the debris between the fins.
 |
| 3/8" wire tube brush getting acquainted with the engine. |
 |
| Leave the handle long on the tube brush to allow for a long reach and some flex to get into difficult areas. |
Continue to scrub every fin, top and bottom until only a light dust comes out. Rinse with water and simple green as you go to keep the surfaces somewhat clean. If you're using steel wire brushes, be careful not to scrub too long because you will leave deep scratch marks in the fins. You'll then need some heavy coats of paint or some primer to level it out again. Once all of the fins have been scrubbed, go back over the outer edge with 240-320 grit sand paper or maybe just a scuff pad to knock off any loose paint that got missed by the brush. Be sure to sand and smooth the top part of the head very well because this is the most visible area.
 |
| Early stages of wire brushing the fins. |
 |
| Cleaned fins ready for a lot of rinsing and further degreasing. |
More cleaning/rinsing is needed because, while the wire brushes scraped away a lot of loose paint, it's inevitable that they also found many chunks of stubborn grease that have now been smeared across the metal. More brake cleaner can be used, but it can leave residue that will need to be removed before painting. Carburetor cleaner does not leave a residue, but can damage paint, so use it carefully. Other safer options are simple green or high proof alcohol. Since I ran out of simple green, I'm using carburetor cleaner sparingly, followed by a full rinse in 91% rubbing alcohol.
Every fin and surface will need to be wiped down with solvent. To do this, I cut strips of paper towels and wrap them around the end of a flathead screwdriver that fits between the fins. Spray generously with rubbing alcohol and replace the strips of paper towels until they come out mostly clean. It's difficult to get everything out of the fins when working with the engine in the frame, but patience pays off.
 |
| Materials for cleaning before paint. |
 |
| My shop apprentice applying the rubbing alcohol generously. |
 |
| Strip of paper towel wrapped around a flathead screwdriver. |
Once everything is clean, it's a good idea to degrease the surrounding materials so tape will adhere nicely when masking off for paint. Another good reason to use rubbing alcohol is that it dries quickly and wont leave hidden puddles that will prevent the paint from sticking. When everything is clean and dry, it's time to start masking off for painting.
I set my Duplicolor aluminum spray can out in partial shade so it can warm up while I mask off the top end. This helps the paint flow and level better. Just be careful because it will run easier. You can also use an etching primer to aide with adhesion to bare metal. I use this on many parts, but have had very good, consistent success with just spraying the Duplicolor engine enamel directly onto bare aluminum engine cases.
For top end repainting, I mask off just below the base gasket so I can hide the edge of the paint job. begin masking from the edges of the painted area outward. Then finish off by covering every surface to ensure no rogue paint particles haze up your trippy frame paint. After taping off the edge near the base gasket, I tape newspaper over the lower edge of that tape and work outward. After the engine is mostly covered, it's time for drop cloths and saran wrap for any odd protrusions like the turn signals. When masking off to paint an engine in the frame, always consider the angles you need in order to properly coat the surfaces. I tape off the down tubes to minimize the interference of the masking on how I can spray onto the fins.
When everything is masked off, look at all the masked surfaces from every angle to ensure that it is all covered. Now it's time for paint. Shake your paint like mad. If you're using an etching primer, follow the instructions and lightly mist the bare metal surfaces. Let it dry and then move on to base coat. Since I'm not using etching primer here, I'm ready for the color. The first two coats should be light. Dont try to saturate and get even coloring on the first two coats. Spray at an upward angle to get the bottom of the fins and a downward angle for the top of the fins (about a 15 degree angle). Let the paint dry for 5 to 10 minutes between coats depending on the temperature you are painting in. After the first two coats, apply a medium coat. Let this dry for a few minutes and then you can apply another coat if needed to level the surfaces a bit.
 |
Top end masked off.
|
 |
| Top end painted and drying. |
Look around to make sure it's even and completely painted. Once satisfied, let it dry for at least an hour before removing the masking. You don't want to ruin or streak the paint by dropping a cloth on it.
 |
| Before paint. |
 |
| The finished product. Next, I'll to throw on the polished covers. |
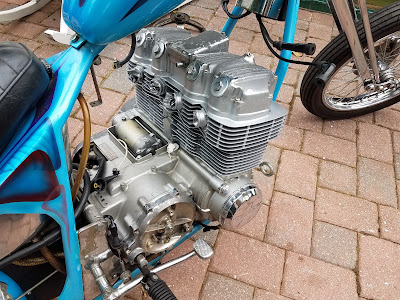 |
| Note the slight different in shine and color between the cases and the top end. |
Let the paint cure for a few days to ensure that it will hold up to impact, solvents, or grease and oil. The next step is to replace the engine covers with a polished set. Removing the valve cover may allow engine oil to leak onto the freshly painted surface. If the paint isn't cured, the oil could permanently discolor it.
So for now, I'll let the engine chill off to the side while I clean and polish all of the other bits on the engine.
The TLDR version:
1. Degrease engine with brake cleaner or other solvent (be considerate of your paint).
2. Scrub fins and surfaces with wire brushes. Use 1/4" and 3/8" tube brushes in a drill to get in between the fins. Finish the paint and debris removal with 240-320 grit sand paper and stuff pads being sure to smooth the top surface of the head.
3. Rinse and wipe down every surfaces until clean. Use strips of paper towels on a screw driver to get in between the fins. Carburetor cleaner and rubbing alcohol do not leave a residue and are best suited for the final rinse before paint.
4. Mask off the area. find a good place to hide the edge of the new paint such as masking right against the base cylinder gasket. Mask all other areas of the bike. Double check your masking. A little acetone carefully rubbed onto fresh paint can remove it quickly. Just be careful and look to see if the color of the paint below it isn't coming off as well.
5. Spray two (2) light coats of paint from a warm, well shaken can. Wait 5 to 10 minutes between coats to prevent runs. The warmer the paint, the better it levels, but the easier it runs. Duplicolor engine enamel works well with or without etching primer (as long as your surfaces are thoroughly prepped). Finish with a medium coat and some touch up to level the surfaces.
6. Let the paint dry for at least an hour before removing the masking.
7. Let the paint cure for several days before doing any other work in the area that may cause the paint to come in contact with solvents or grease and oil. Solvents may quickly remove the fresh paint and the grease and oil may discolor it.
8. Enjoy your engine now that it doesn't look like a boat anchor.


